
The Data Explorer
The Data Explorer is the full search-term table for an account — every term over your chosen date range, with filters, sorting and bulk actions for excluding or watching terms.
Overview
You'll find it on the Data Explorer tab of every connected account, and on every uploaded keyword file. Where the Waste Report groups flagged terms into patterns, the explorer is the raw list — the place to answer "show me every term matching X" questions the cards don't.
Each row is one search term in one campaign and match type — the same term can appear on several rows. Above the table sit the controls:
- Filter: chips — All, High, Medium, Low — narrow the list by waste confidence.
- Only with spend hides zero-cost terms.
- A search box matches against the search-term text.
- Columns chooses which metric columns the table shows.
- Advanced Filters opens campaign and match-type pickers plus range sliders for every metric.
Every term carries a status badge beside its name:
| Badge | What it means |
|---|---|
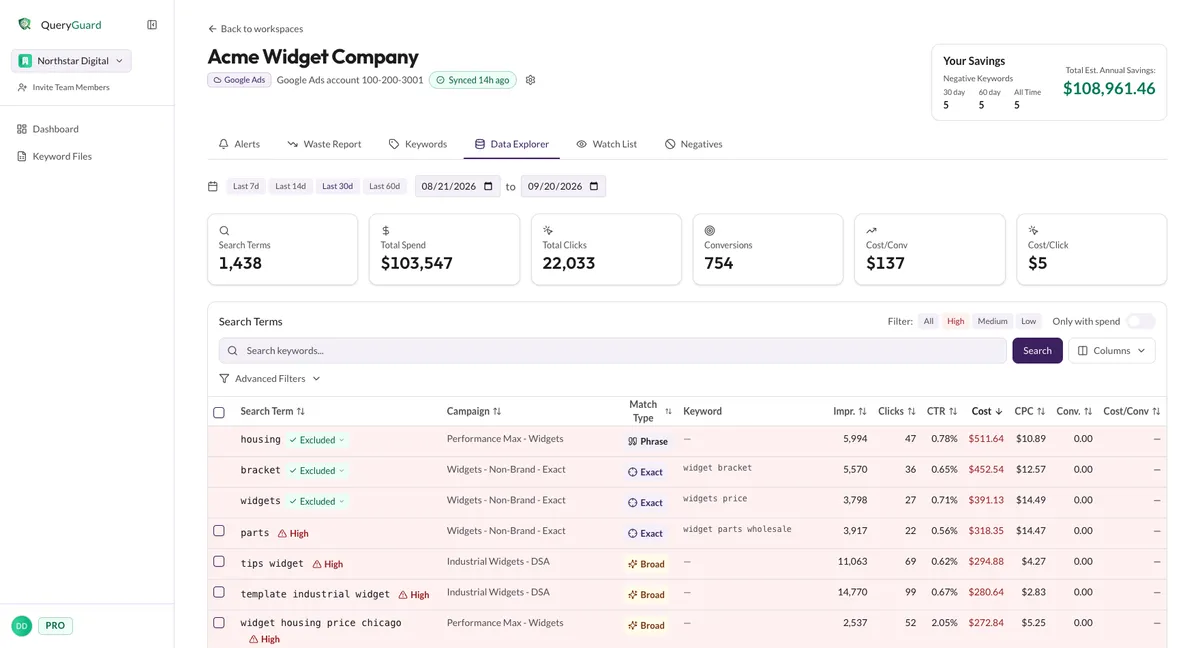
| High — red | No conversions, and at least 10 clicks or $50 in spend |
| Medium — amber | No conversions, and at least 5 clicks or $20 in spend |
| Low — blue | No conversions, below the Medium bar |
| Active — grey | The term converts, or has no spend — nothing flagged |
| Excluded — green | Already covered by a negative keyword |
High and Medium rows are tinted to match their badge, and the Cost figure takes the badge's color — the reddest rows are the most confident waste.
Direct link: Dashboard
Quick Tips
- High confidence plus Only with spend is the fast "spent real money, converted nothing" view.
- Every filter, sort and page writes to the URL, so the address bar always holds a bookmarkable view — see step 8.
- Changes inside Advanced Filters are a draft until you click Apply Filters — clicking chips or dragging sliders alone doesn't change the table.
- The numbered badge on Advanced Filters counts filter groups, not values — one campaign chip and one dragged slider reads "2".
- Your column choices are remembered across visits, so the table stays the way you left it.
- Excluded rows can't be selected — the checkbox is empty because they're already handled.
Steps
1. Open the Data Explorer
On a connected account, choose the Data Explorer tab. The date presets and custom range above the table set the window every row and filter covers — see The account view for how the range works.
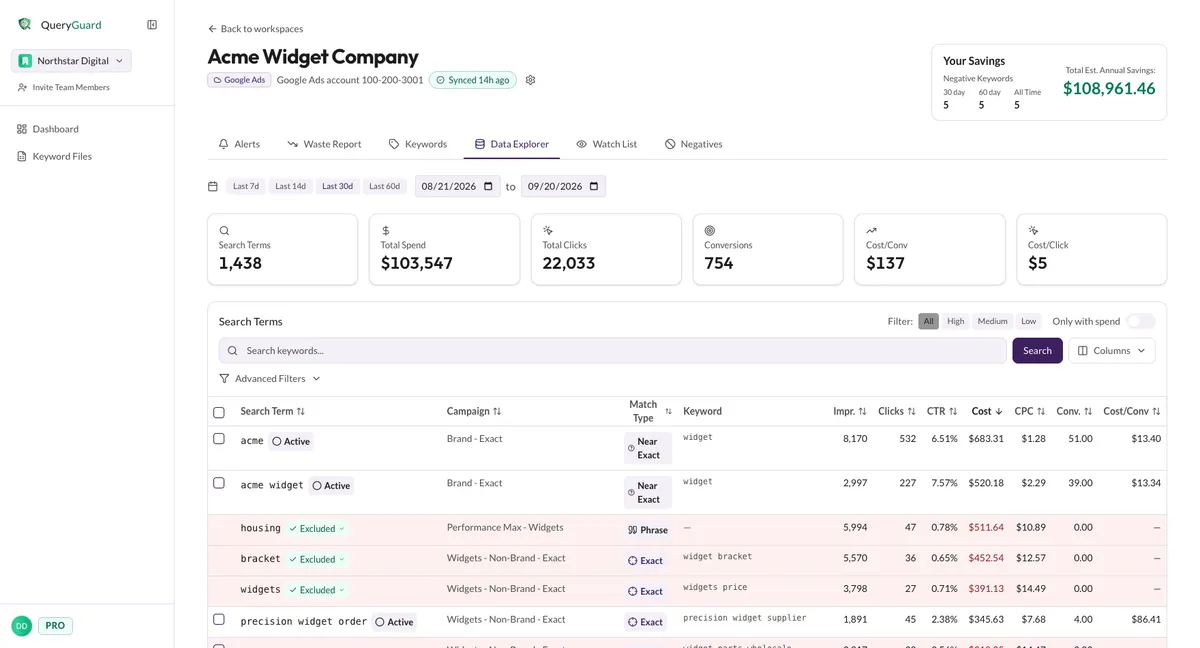
The table opens sorted by Cost, most expensive first — the default view already puts the biggest terms on top.
2. Narrow with the quick filters
The Filter: chips apply the moment you click them. High leaves only the terms with real spend or clicks behind them and no conversions — usually the right place to start. All brings everything back.
Flip Only with spend on to drop terms that registered impressions but never cost anything.
3. Search for a term
Type in the search box and press Enter or click Search — it matches the search-term text, case-insensitively. A Clear button appears while a search is active and resets it.
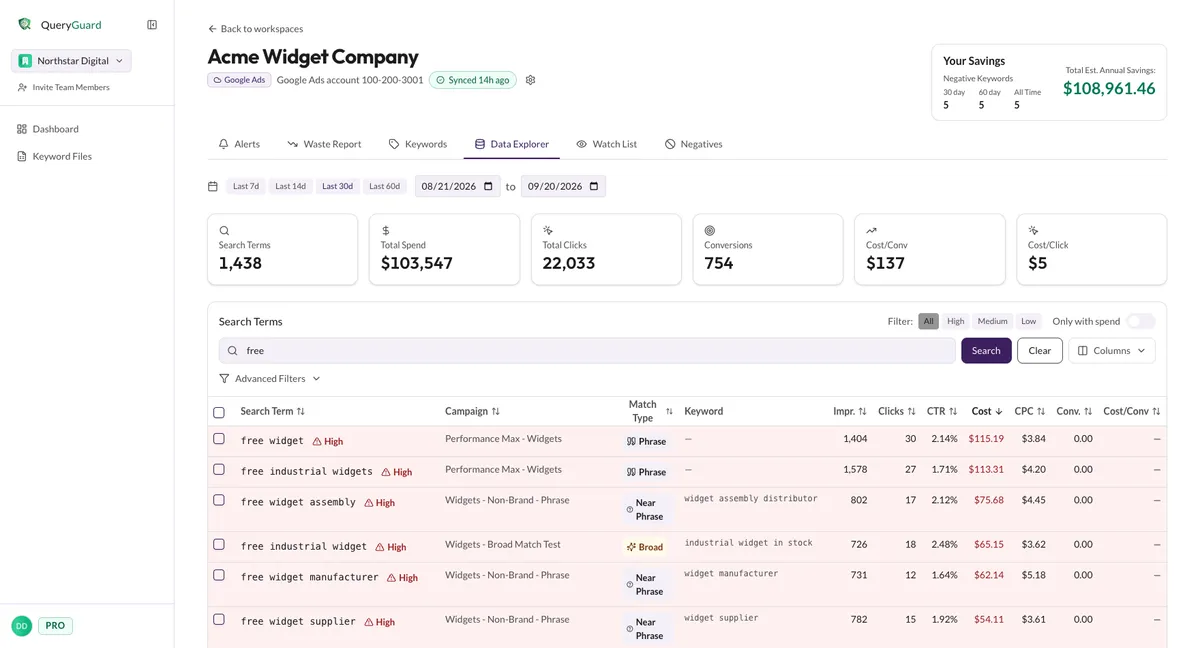
Choosing View in Data Explorer on an alert lands here with that term already searched — the shortcut for checking a term's numbers in context.
4. Choose your columns
Click Columns to open the column chooser, then tick the columns you want: Campaign, Match Type, Keyword, Impressions, Clicks, CTR, Cost, CPC, Conversions, Cost/Conv. Click Columns again to close it.
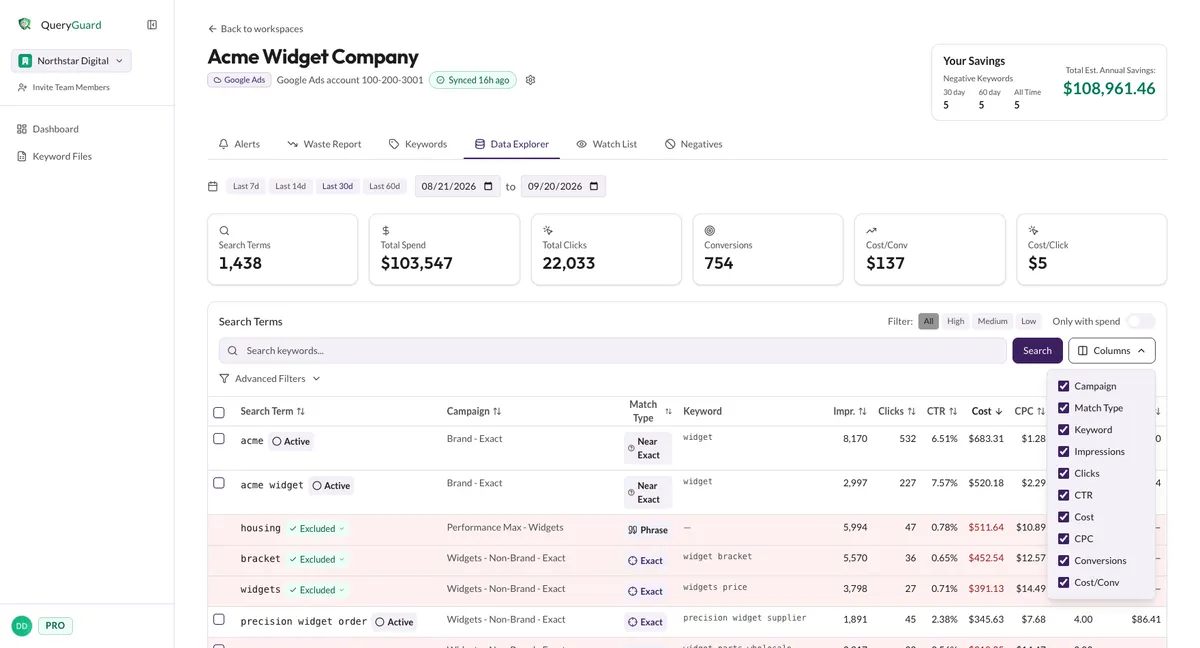
The Keyword column names the keyword that triggered each term — useful when deciding whether to exclude the term or fix the keyword. It shows "—" for traffic with no keyword behind it (Dynamic Search Ads, AI Max, Performance Max) and "first +N" when several keywords triggered the term.
5. Apply Advanced Filters
Click Advanced Filters to open the panel. Nothing in it applies until you click Apply Filters — build the combination first:
- Campaigns — tick one or more campaigns to restrict the table to them.
- Match Types — restrict to terms matched through specific match types. The chips use the raw match-type names (BROAD, NEAR_EXACT).
- Six range sliders — Impressions, Clicks, CTR (%), Cost ($), Conversions, Cost/Conv ($) — each with a histogram showing where your terms actually sit, so you can drag the handles to a meaningful range instead of guessing.
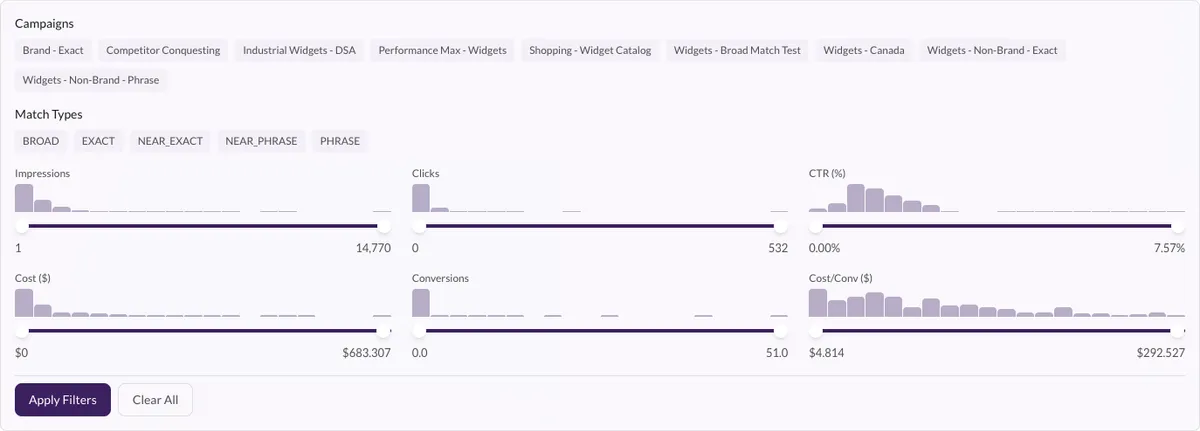
Apply Filters runs the combination and puts a count badge on the toggle. Clear All removes every advanced filter at once. The panel combines with the confidence chips, spend toggle and search — "High confidence, this campaign, cost over $50" is a three-second query.
6. Sort and page through the results
Every column header except Keyword is a sort button. Click a numeric column and it sorts highest first; click a text column and it sorts A to Z; click the active column again to flip the direction. The arrow on the header shows which way it's going.

The table shows 100 terms per page. The footer reads "Showing 1 - 100 of N" and offers Previous page, numbered pages and Next page. Changing the sort or any filter returns you to page 1.
7. Select rows and act in bulk
Tick the checkbox on any row — or the header checkbox to take every selectable row on the page — and a bulk bar appears above the table:
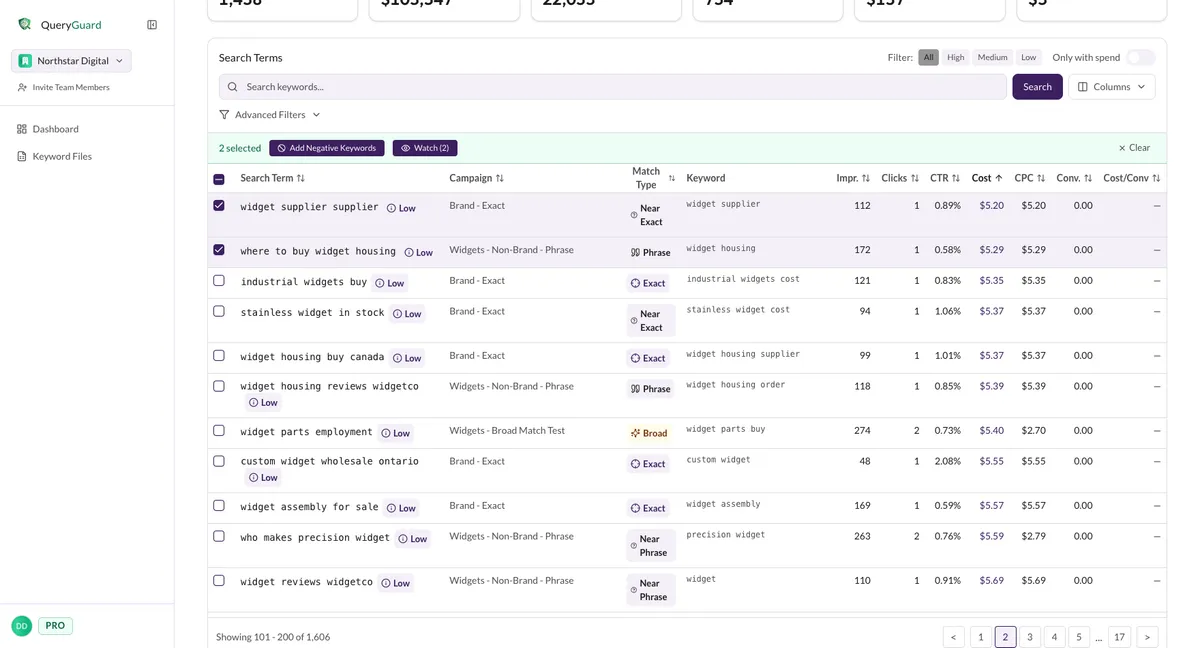
- Add Negative Keywords opens the exclude window for the whole selection — each term is excluded from the campaign it came from. See Add negative keywords.
- Watch (N) / Unwatch (N) adds or removes the terms on your watch list.
- Clear deselects everything.
The selection clears when you change page, sort or any filter — finish the bulk action before moving on.
8. Manage an exclusion in place
A term that's already excluded shows the green Excluded pill instead of a checkbox. Click it and choose Modify Negative Keyword to change the negative's match type or remove it entirely — the same window the Negatives tab uses.
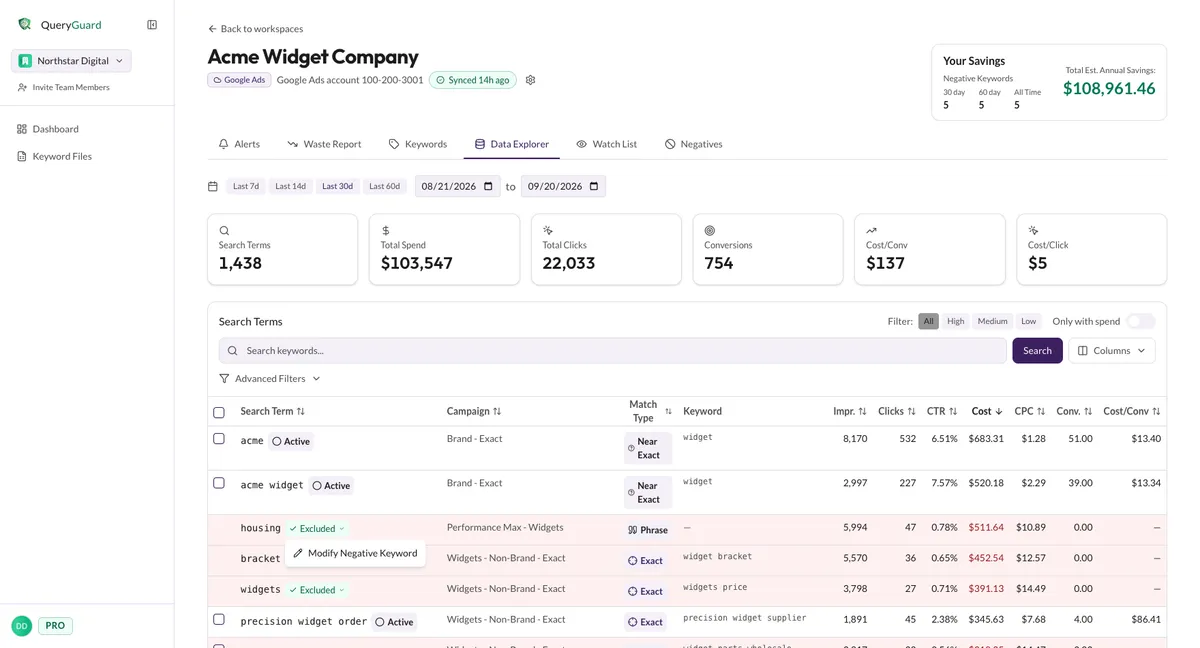
See Manage negative keywords for what changing or removing a negative does.
9. Save or share a view
Every control writes to the URL — the date range, confidence, Only with spend, the search, the sort, the page and all advanced filters are in the address bar as parameters like ?tab=explorer&confidence=high&onlyWithSpend=true&sortBy=clicks.
Copy the URL to bookmark a view you check regularly, or paste it to a teammate — they'll need workspace access to open it. One caveat: filter changes replace the URL in place, so the browser's Back button leaves the tab rather than stepping back through them.